
DiviLa belleza, cuando se formula con delicadeza.
Un espacio donde la estética se observa, se estudia y se siente. Tendencias, rituales y ciencia suave aplicada al cuidado personal.
Nosotros
La belleza también se piensa.
La belleza también es criterio.
The Sweet Art Atelier nace de una convicción clara:
la estética no necesita exceso para ser poderosa.
Creemos en la belleza que se construye con tiempo,
en el cuidado que entiende la piel como un lenguaje,
y en la técnica aplicada con sensibilidad.
Aquí lo dulce no es superficial.
Es precisión, selección y respeto por el cuerpo.
Cada fórmula, cada ritual y cada tendencia se observa, se filtra y se transforma en experiencia.
The Sweet Art Atelier no enseña a consumir belleza.
Invita a comprenderla.

Novedades
Micropigmentación Madrid: El Arte de las Cejas Perfectas
Micropigmentación Madrid: El Arte de las Cejas Perfectas Las cejas son arquitectura del rostro. No es vanidad decirlo: son geometría, expresión, luz. Y cuando no nacemos con ellas tal como las imaginamos, existe una solución que ha revolucionado la belleza madrileña...
Hilos Tensores en Valladolid: La Precisión como Ritual de Elevación
Hilos Tensores en Valladolid: La Precisión como Ritual de Elevación Existe un momento en el que la skincare deja de ser suficiente. Cuando las cremas, los sérums y los rituales nocturnos han hecho su trabajo pero la gravedad sigue su curso inexorable. Aquí es donde...

Lifting sin Cirugía en Valladolid: El Ritual de la Renovación Facial Sin Bisturí
En The Sweet Art Atelier creemos que la belleza es un acto de precisión y paciencia. No de urgencia ni de promesas imposibles. Por eso hoy queremos hablar de algo que está transformando silenciosamente la forma en que cuidamos nuestro rostro: el lifting sin cirugía...
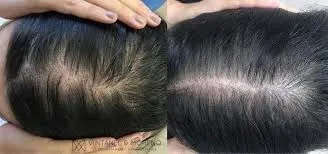
Rituales estéticos conscientes: cuidado capilar y corporal con criterio
Hay gestos cotidianos que, cuando se realizan con intención, cambian por completo su significado. Limpiar la piel. Aplicar un suero. Masajear el cuero cabelludo. En The Sweet Art Atelier entendemos la estética como un ritual silencioso: preciso, íntimo y profundamente...

Hilos tensores: el ritual delicado que redefine el rostro
En The Sweet Art Atelier creemos que la belleza se cultiva en los detalles. En los gestos pequeños. En los tratamientos que no buscan sorprender, sino sostener. Por eso, cuando hablamos de hilos tensores, lo hacemos desde un lugar muy concreto: el de un ritual...